Module 2: VirtualBox Setup
In this module you install VirtualBox and build the private network your lab VMs will use. At the end, the foundation is ready for building the domain controller in Module 3.
In This Module
Section titled “In This Module”- Install VirtualBox
- Create a NAT Network for the lab (10.0.10.0/24)
- Disable VirtualBox’s built-in DHCP so your Domain Controller can provide it instead
- Understand why the lab uses its own isolated network
Install VirtualBox
Section titled “Install VirtualBox”The steps below show the Windows installation workflow. If your host computer runs macOS or Linux, follow the matching host instructions in the official VirtualBox installation guide, then return here after VirtualBox Manager opens.
- Run the installer you downloaded in Module 1.
- Accept the defaults on every screen. You do not need to change anything.
- If the installer warns that your network connection will be temporarily disconnected, click Yes. This is normal. VirtualBox installs virtual network drivers, and the interruption lasts a few seconds.
- On Windows, the installer may ask to install Microsoft Visual C++ Redistributable first. If so, install it, then run the VirtualBox installer again.
- Finish the install and launch VirtualBox. You should see the main VirtualBox Manager window with an empty list of virtual machines.
How the Lab Network Works
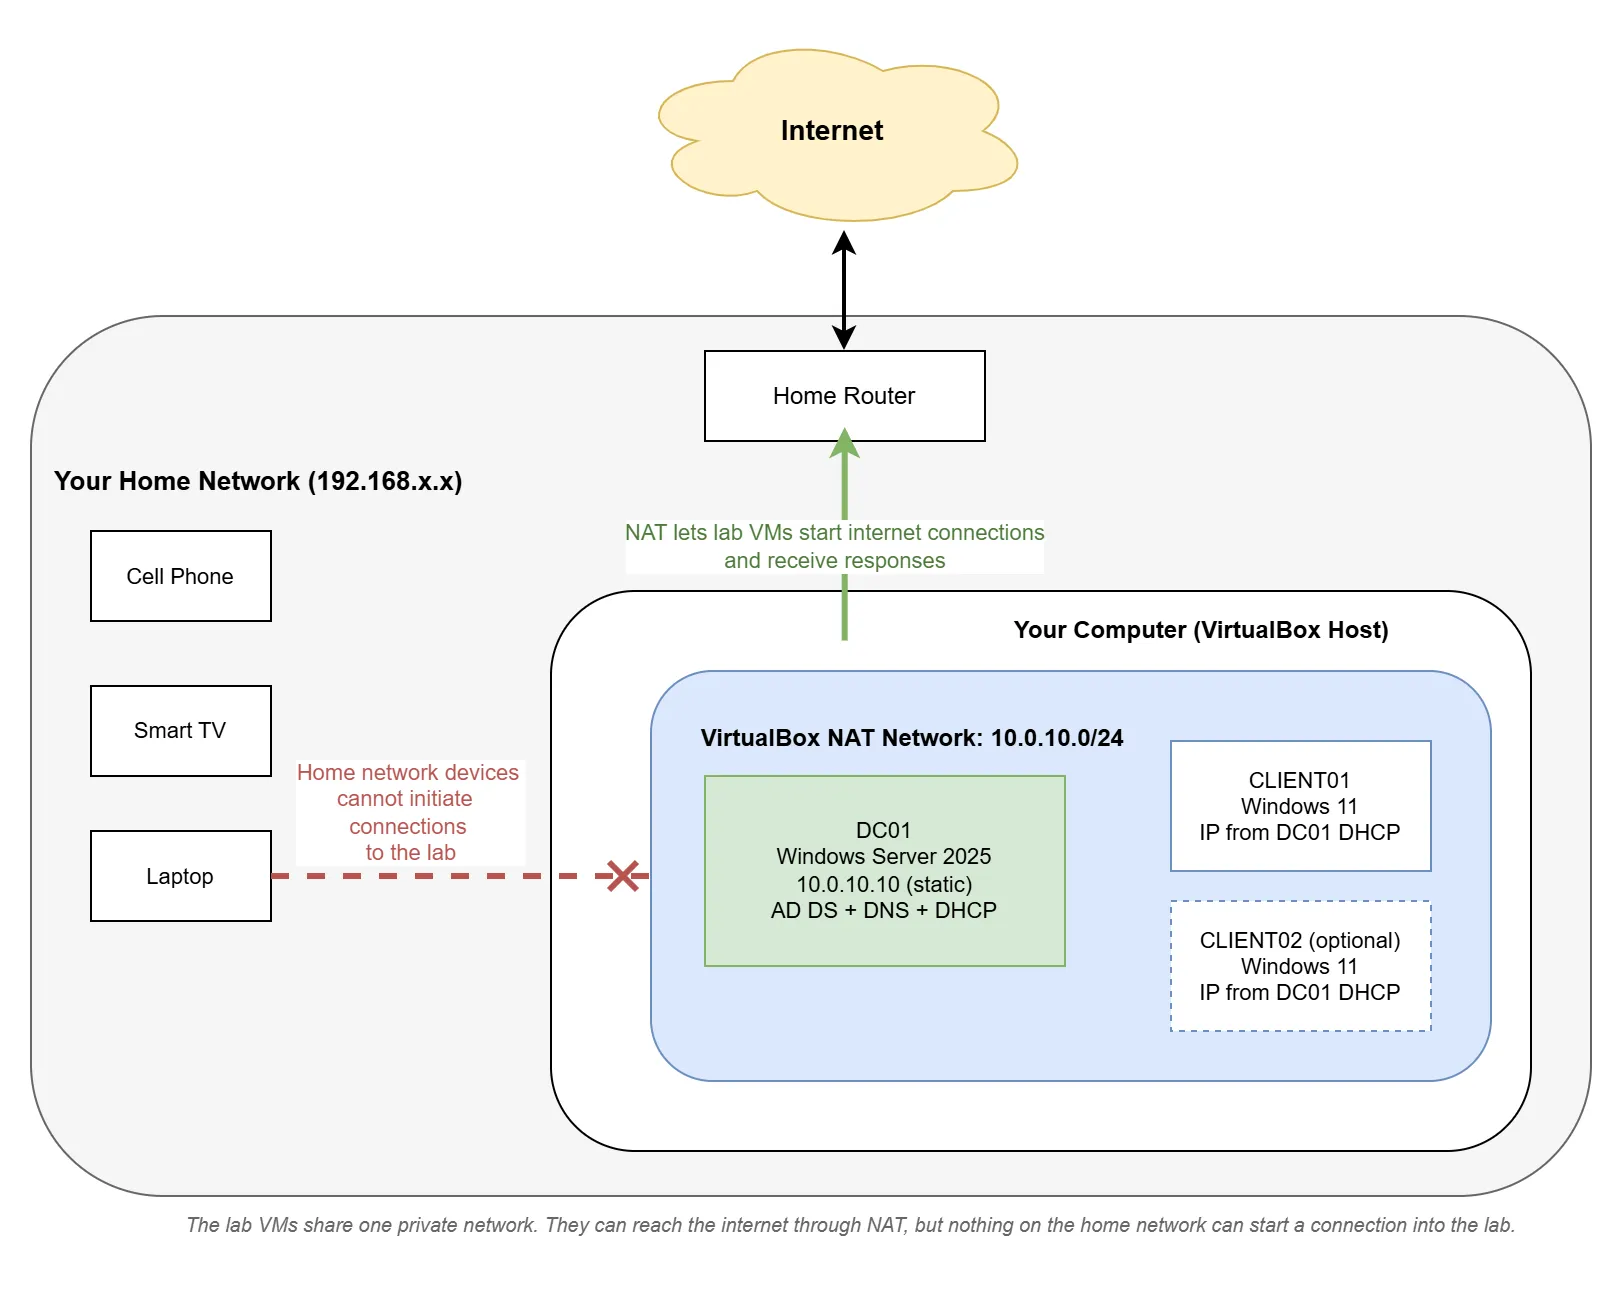
Section titled “How the Lab Network Works”The lab runs on its own private network inside your computer. The VMs can talk to each other and reach the internet for updates and downloads, but the lab’s DHCP, DNS, and Active Directory traffic never touches your home network, and your home devices cannot connect into the lab.
That isolation is one-way, though. Lab VMs can still make outbound connections to the internet and to your home network, so the lab is contained, not sealed. The Active Directory exercises in this guide use ordinary Windows network traffic, but this configuration should not be treated as a security sandbox for malware samples or penetration testing tools. That kind of work requires stronger isolation and is beyond the scope of this guide.
Create the Lab Network
Section titled “Create the Lab Network”VirtualBox calls this type of network a NAT Network. You create it once, and every lab VM will attach to it.
- In VirtualBox Manager, open the menu File > Tools > Network Manager.
- Click the NAT Networks tab.
- Click Create. A new network appears in the list.
- Select it and set these properties:
- Name:
ADLab - IPv4 Prefix:
10.0.10.0/24 - Enable DHCP: unchecked
- Name:
- Click Apply, then close Network Manager.
The 10.0.10.0/24 prefix comes from the private 10.0.0.0/8 address space defined by RFC 1918. A /24 network provides addresses from 10.0.10.1 through 10.0.10.254; VirtualBox uses the first address as the NAT gateway.
That is the entire network setup. You will attach each VM to the ADLab network when you create it. This guide does not create any inbound port-forwarding rules.
Why Disable DHCP?
Section titled “Why Disable DHCP?”DHCP is the service that hands out IP addresses to devices on a network. VirtualBox has its own built-in DHCP server, but this lab disables it so you can learn to configure the DHCP role in Windows Server. Organizations may run DHCP on Windows Server, a router, or another network appliance. If VirtualBox DHCP remained enabled after you configured Windows Server DHCP in Module 5, both services could answer client requests and cause inconsistent network settings.
Until Module 5, the lab network simply has no DHCP. That is fine, because the domain controller uses a manually assigned address anyway.
Further Learning
Section titled “Further Learning”These optional references provide more detail from official maintainers and trusted educators:
- Installing VirtualBox covers the official host-specific installation steps for Windows, macOS, and Linux.
- VirtualBox Virtual Networking explains NAT Networks, DHCP, port forwarding, and the other available network modes.
- VirtualBox Guest Additions describes the drivers and integration features installed inside a VM.
- RFC 1918: Address Allocation for Private Internets defines the private IPv4 address ranges, including the range used by this lab.
- Ed Harmoush’s Networking Fundamentals video series provides a beginner-friendly explanation of how hosts, switches, routers, and common protocols move traffic across a network.
Checklist Before Moving On
Section titled “Checklist Before Moving On”- VirtualBox installed and the Manager window opens
- NAT Network named ADLab exists with prefix 10.0.10.0/24
- DHCP is unchecked on the ADLab network
Continue to Module 3 to create the domain controller VM and install Windows Server 2025.